T h e T u t o r i a l
Going 3D
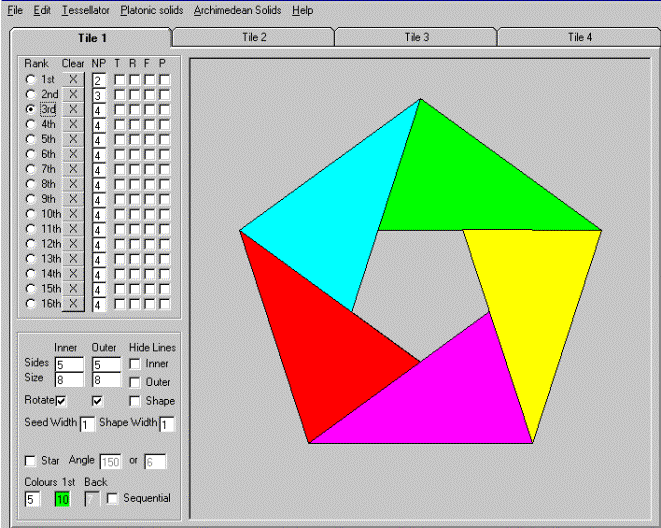
Let’s begin to put the program through it’s paces. So far we have only just scratched the surface. Begin by building first a Pentagon in TILE 1, and then a Hexagon exactly as it’s been done before in TILE 2, (Use the horizontal version of the Hexagon). The reason I’m being this specific (Pent. In Tile 1, and Hex in Tile 2 etc) is to begin to show some of the extraordinarily powerful capabilities of this program, and to do this we need to prepare the tiles in a specific order. Once they are built in Tile 1, and Tile 2 they should look like these:
Example of what Tile 1 should look like
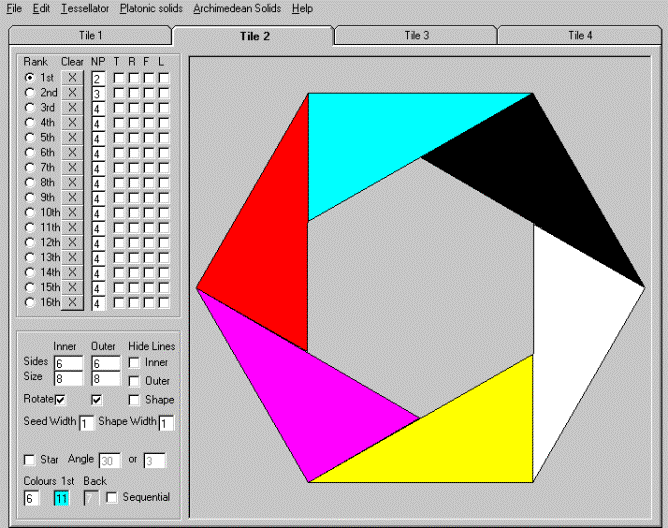
Example of what Tile 2 should look like
Save these as PRZ files under whatever file name you choose, but if you save them after they are both built, then when you restore them, they will be restored together. They will work together to build this:
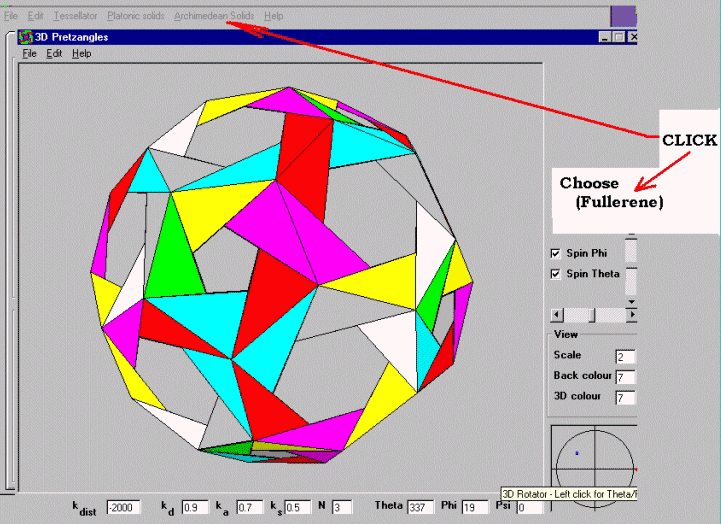
(Example of an Archimedean Solid built automatically
and rotating)
Once those two Tiles are in place, is all one has to do is go to the Archimedean Solid (Menu Button), and choose the (Fullerene) option, and Shazam!!!, the rotated version of what you see above, comes on the screen and begins to revolve. [There may be a warning to return all Ranks to 3, but this will happen automatically, once you press OK… OK?] This illustrates one of the most amazing attributes of Pretzangles: When ‘Seeds’ are placed juxtaposed to one another upon the surface on any solid, they ‘Automatically’ create circuits around the surface of the entire object (for example, in a case such as this, the circuits were constructed exclusively from just two polygon ‘Seeds’) and return to their origin. The entire surface of the solid becomes covered with interwoven designs composed of autonomous circuits.
Even after having used this feature of Steve’s Program for months, it still seems unbelievable, and if one chooses to, you can even go into the file menu, at this point, and save it as a VRML. There is also a Spherical section, to create your own revolving Sphere, filled with the interwoven designs.
Obviously there are hundreds more ways to begin to build these designs. I’ve just illustrated the very basics in order to get you on your way. Hopefully you are ready to jump in and start building your own Pretzangles. I’ve listed both my email and snail mail addresses in the Introduction, in case you are interested in more detailed examples.
Click to see the previous section of the tutorialClick to return to the home page